Monday, October 22, 2012

Wow its been awhile...

Sorry that its been so long since I posted. No one reads this anyway but still...
Nothing exciting going on with me really. Just getting ready for the holidays. Doing a lot of crocheting, beading and general crafting. I'm trying to finish my family gifts and stock my Etsy shop before the holiday shopping really gets underway. Visit my Etsy to see everything I have available but here are a few pictures of what I have in the shop so far.

 http://www.etsy.com/shop/LittleDs


Tuesday, July 17, 2012

Chocolate Mousse for my Favoritez birthday.

Hello two people who read this!

Sorry I haven't been posting. Not much going on really. It is my favorite boyfriends birthday this month so today I am making him a special dinner because he doesn't want any presents. He already bought himself several games from Steams summer sale so those are his presents to himself I guess. Hes a weirdo I know.

Tonight I'm making him some rib-eye steak, baked potatoes, creamed spinach (for me, maybe recipe to come later) and chocolate mousse for dessert. Its dessert I'm really here to talk about. For a lot of people chocolate mousse seems way too complicated and fancy to make at home and I'm not gonna lie it does take some skill, but you can do it!  I made my first chocolate mousse when I was 16 and it was pretty good but I have improved my technique and recipe and I'm going to share it with you.

Chocolate Mousse Recipe:
  
2 cups chilled heavy cream
4 large egg yolks
3 tablespoons sugar
1 teaspoon vanilla
7 oz fine-quality bittersweet chocolate (not unsweetened), chopped


First, you need some quality ingredients. I recommend  ghirardelli chocolate semi-sweet in chips or a bar that you cut very fine. Any fine semi-sweet chocolate will do just remember not to use milk chocolate or dark chocolate and to use a chocolate that you would like to eat plain. If you don't like to eat it straight up you won't like it in a mousse. Using dark or milk chocolate will affect the texture of your mousse because of the varying amount of cocoa solids/butter ratio. If this all confuses you just take my recommendation and use  ghirardelli semi-sweet.

Now that you have your chocolate you need some heavy whipping cream. No substations on this. Don't try to use regular cream or half and half or milk or anything like that. Heavy whipping cream! Also, make sure it is chilled and that your bowl is chilled that you'll whip it in later.

Last but defiantly not least you'll need some good quality vanilla or other flavoring agent. I use vanilla usually because I am adding peanut butter to the serving cups and any other flavor would be weird but you can add many things. A little instant espresso powder is good. (Be sure to dissolve it is the hot cream mixture.) 3 tablespoons amaretto, 3 tablespoons Grand Marnier or 2 tablespoons Cognac whisked into the custard is good as well.

Now that you have all your ingredients here is what you do:

Heat 3/4 cup cream in a heavy saucepan until its hot. Not too hot! Just hot enough to be steaming and uncomfortable to touch.

Whisk together yolks, sugar, and a pinch of salt in a bowl until combined well, then add the hot cream in a slowly.
 Whip egg yolks, salt and sugar.

After adding the hot cream.


 Pour the mixture into the saucepan and cook over moderately low heat, stirring constantly, until it registers 150°F on thermometer. If you don't have a thermometer it takes about 2 mins on medium to get to temperature. Pour the custard into a bowl and stir in the vanilla. (or other flavor additive) Add the chocolate to the hot custard mixture and stir until its melted.
 Nice chocolate custard. Yum!

 Put it in the freezer to cool. Stir it after 5 mins and check the temp. it should be cool but not cold.
Beat remaining 1 1/4 cups cream in a bowl with an electric mixer until it has stiff peaks. Don't under beat your cream. This is the death of many a mousse.
 I added my vanilla to the cream because I forgot to put it in the custard. 

 Then take the egg whites you have left and beat them up too. Stiff peaks for these as well.

Before.

After. Thems fluffy egg whites!

Whisk one fourth of cream into the chocolate custard to lighten it up, then fold in remaining cream gently! but thoroughly. Never stir! This will pop all the bubbles you just spent all that time whipping up.

 About this much cream.

Lightened custard.

Added the cream in 2 more parts.

Now add egg whites in the same manner as the cream. You don't need to add all the whites to this recipe. Just add in small scoops until you get the flavor and texture you want. I added two large scoops. Thats about 2 1/2 whites.

Whites!

Spoon mousse into glasses or ramekins and refrigerate, covered, at least 6 hours. Let stand at room temperature about 20 minutes before serving.

Heres where I get fancy! Im a classy lady guys. Like, SO classy. So plain ramekins will never do for me. Plus, Sean really like peanut butter. Here is what you do.

Take some fancy glasses. (I'm sure you have some wineo) then get some peanut butter, a spoon and a plastic bag.

 Supplies for fanciness!

 Spoon peanut butter into the corner of the baggie.

Microwave for 10 seconds.

Cut a small hole in the corner.

Now you swirl the peanut butter in those glasses like a boss! Look at how fancy that is!

SO classy. Any man will be amazed! Who doesn't like peanut butter and chocolate? 

Now go forth and make a dessert fit for a classy lady!

Delilah takes care of clean up. If you don't have one of these I guess you can use a dishwasher...

Friday, June 8, 2012

New coral reef succulent display and a project update!

Hello blog readers! If you're also friends with me on facebook, which Im pretty sure every single one of you are, then you already know about my awesome new succulent coral reef! Awesome, am I right? I was inspired by this beautiful reef bed planting http://pieceofeden.blogspot.com/2011/01/sherman-gardens-coral-reef-succulent.html  You should really take a look at it.

All it needs are some fish swimming around and you wouldn't be able to tell the difference! Succulents are amazing plants. They come in so many unique shapes and colors. I chose mine for light blue and sea foam green colors as well as wavy and coral-like shapes. I through in a Golden Sedum and purple and blue Echeveria "Neon Breakers" for a color pop.
I really think the Gollum Jade looks very much like a coral. With its tube shaped leaves and green and red color you almost expect a clown fish to come swimming out from behind it!

From the top it looks just like looking into a fish tank! Can you tell Im pretty proud of it? I think its pretty damn cool. I used green glass pebbles to give it a watery look and added some stones for texture.


Ok now on to the brief project update.

Here it is! Not even half done cuz I've been a bit lazy and busy. Can you tell what it is yet? Sean can't and hes even seen the pattern picture. Men!

This is made up of 391  2.5 in squares and will be 5ft 7in tall when I finish. Its already looking pretty awesome.

Wednesday, June 6, 2012

How to make the best roasted artichokes ever!

When I was visiting my family in Salinas everyone was talking about the great artichokes that were in season right now. When I got back home I noticed artichokes just happen to be on sale at my grocery store. It was fate! I rushed out and bought some and here is how I like to cook them.

Their are beniftis to oven roasting your artichokes. Artichokes are an excellent source of dietary fiber, magnesium, and the trace mineral chromium. They are a very good source of vitamin C, folic acid, biotin, and the trace mineral manganese. They are a good source of niacin, riboflavin, thiamin, vitamin A, and potassium. They have also been found to help lower cholesterol. When you use the most popular method of cooking artichokes, boiling, you lose a lot of those vitamins and minerals to the water. Steaming is also a fine way to keep the goodness in the artichoke but I find that it doesn't impart as much flavor as roasting.


Select artichokes that are heavy for their size and globe shaped with tight leaves. Smaller non-jumbo artichokes will usually be more arrow shaped, that's fine its just how the smaller ones are. I used jumbos that were very large cuz I'm a jumbo food kinda girl!

Once you've selected your artichokes now its time to prepare it for roasting.
Fist you want to cut the steam off right at the base to create a flat bottom so it will stand up on its own in the oven. If your steam is large enough you can peel it and cook it along side the artichoke.

Next cut the top 2 inches off. None of this is edible anyway and it opens up the artichoke for flavor maximization!

Use a paring knife to cut out a bit of the inside leaves. You'll be cutting just the small undeveloped leaves you don't eat anyway. Be very careful. The inside leaves can have very sharp thorns.
Isn't it cute! Like a little barrel ready to be filled with flavor!
Now place the prepared artichoke on a large piece of heavy duty foil. Enough foil to wrap the artichoke up later. Now peel as much garlic as you would like. I recommend at least 6 cloves per choke. I love me some garlic though and ended up using about 10.
 Now pull apart the leaves and sprinkle liberally with salt and pepper. Cut a lemon in half and squeeze the juice over the artichoke. Use half a fresh lemon for each choke. Place garlic cloves in the hollowed out middle and cut the remaining cloves and place them between the leaves. Drizzle the whole thing with a good olive oil and wrap up tight.
Place the wrapped chokes in the middle of a 350 degree oven. I know its not in the picture but I recommend placing them on a sheet pan because one of mine did end up leaking oil. Mine took 2 hours but if you're not using such big chokes it should take about an hour and a half.
And out comes the best artichoke you've ever had! Look at it! Its beautiful! You don't even need sauce! If you do feel the need for a sauce I'll let you know what I use.

I love mayo one my artichokes but it is god awful for you. So here my compromise on a mayo sauce.
My sauce uses low fat sour cream to cut some of the fat of the mayo. You can also substitute Greek yogurt for the sour cream. Also feel free the make it with no mayo at all for an even lower fat version. 

Sour cream/mayo garlic artichoke dipping sauce:
 Makes enough for about 3 artichokes.

    1/3rd cup Sour cream or Greek yogurt
    1 oz. Olive oil Mayo
    1ts fresh lemon juice
    1/2 ts Garlic powder
    2 cloves of garlic put through a press or very finely minced
    Salt and Pepper to taste

If you don't like garlic you can add other flavors to this sauce instead.
Chili powder or Cayenne pepper would be nice instead of garlic.
Add a little more lemon juice and some zest for a lemony sauce.
Or go in an Asian direction by adding a little sesame oil, honey, lemon and Worcestershire sauce. Expand your artichoke dipping horizons!


Tuesday, June 5, 2012

Went to Salinas, drive home went horrible awry.

Sorry for my lack of posts. I've been pretty busy working on my project and I was out of town visiting my lovely family.

So firstly I'll tell you about my trip to Salinas. It was great. I got to see my family for a whole 3 days including my cousin Jordynnes new baby, Areylia.

Thats one fresh baby pulled right from the baby maker.

Me holding a 3 week old slightly less fresh baby.

Justine and I had a great time hanging out and catching up with family and friends. We had a pizza party graduation for my cousin Jordynne that was awesome and fun. I'm glad that my friends Caitie and Lexi could make it! :) The girls and I got to go check out the new Goodwill and Savers. At Savers we found some real winners of awesomely crappy romance novels featuring some sort of were-people. So far I'm reading Bengal's Heart and its pretty fantastic. I think I might review it here on my blog when I'm finished. 

Now, on to the epically horrible drive home. My car has been having some brake issues. Basically it sometimes doesn't stop when you push the brake. You have to pump it and then its fine. Its not as scary as it sound and it happens only in close traffic where you're using the brake a lot and even then its less than 50% of the time. So I groomed my aunts dog when I was in Salinas in exchange for her to get my car looked at by her mechanic.(If that doesn't sound like a fair trade, you've never groomed my aunts dog. She awful.) So a couple hours and $60 charge later the dude says he can't find anything wrong with it and I just take it home. 

Sunday morning I get up at 6am and we're on the road by 7:30am. Everything is going fine and we're just 2 hours from home when I seem to hit a rock or something and my car starts making a sound like something is stuck on the tire. So we pull off the road and get out to take a look under the car. We see nothing under the car or on the wheel. Justine calls her mechanic friend and he says we might have hit something bad enough to brake the bands in the tire and make an air bubble in the wheel. This is bad news as if that is the case the tire could explode and we would be driving not only without our left front tire but with no brakes or steering. Oh and also it could take out the front left light and a whole bunch of other bad stuff that would probably end in us flying down the road in a fishtailing fiery ball of death.
Not cool guys!
So, naturally, we're pretty freaked out and shitty luck has landed us in a town of closed mechanic shops and no walmart, autozone, pepboys or any other chain type mechanic place. Seriously Santa Barbara wtf? The closest thing we can find is an Autozone 14 miles away. Is it safe to drive the car that far you ask? Why no! Of course not! Do we have any other choice? No. 
So off we go!
At 20 mph.
In a 45 mph zone.
SO as to not appear to just be a dick driving so slow we put our hazard lights on and proceed to take a nice 45 min 14 mile drive. We're almost to the Autozone and a biker pulls up along side our car and says "Do you know you have your hazard lights on?" 

To which Justine replies " Well we have a hazard."

He bids us good luck and we drive on to the Autozone. After that I just lost my shit for a second and started laughing slightly hysterically and turned to Justine and said "Justine, did you know we have our hazard lights on?" It had been a stressful day people.
  
We had already been calling people and figuring shit out for 2 hours so by the time we reach the auto zone we are 2 hours and 45 mins behind schedule. The people there were very helpful and got our car looked at quickly. after about 40 mins he comes in and says that its not our tire. Apparently, one of the bolts for our calipers wasn't put on tightly enough and it fell off. So we were driving with our left front brake hanging off.

Thanks a lot Salinas mechanic! You almost killed us! That is shoddy work at best! 
I will be sending him the paper work from Autozone and getting my money back from him! It was one of the worst times of my life and he owes me for it! 

After all that we did make it home by about 5pm. Pretty long day. I'm glad to be home but it could have gone a lot smoother.

Here are some pictures of the lovely orchid my mom bought me at the farmers market to calm me down after telling that horrible story.


Wednesday, May 16, 2012

Mysterious Project!

Short post today. I'm embarking on one of my largest crochet projects ever! Wish me luck and pray for my wrist! I hope to be done with this project in less than 15 days. Hopefully less than 10 even. I won't tell you what it is but it involves crocheting 391 squares! I'll post the finished project here when Im done. Enjoy the anticipation!

Sunday, May 13, 2012

How I made 2 kinds of caramel by accindent.

Sooooo, I decided it might be fun to try to make one of my favorite candies, caramel. I think of all the candies in the world nothing, save chocolate, is more versatile and tasty than caramel. In this post you'll see how the same ingredients heated just slightly lower or higher can turn into two very different candies (by complete accident lol).

Okie dokie, so firstly you'll wanna know the recipe. I got it online here: http://www.mycookingadventure.blogspot.com/2010/10/salted-chewy-caramels.html

The ingredients are:

5 tablespoons butter
1 cup heavy cream
1 teaspoon vanilla extract
1/4 teaspoon kosher salt
1 1/2 cups sugar
1/4 cup light corn syrup
1/4 cup water
Firstly, be prepared to fail. I did the first time. It actually ended up working out but just have extra ingredients just in case.  Now what you want to do is get everything ready before any cooking starts because sugar is a fickle mistress and will go from perfect to OMG BURNING in less than a second, as I learned. So line a 9x9 baking pan with foil and spray the foil with vegetable oil spray.

Once you have everything ready you can start. In a small sauce pan melt the butter, once melted add in the heavy cream, vanilla, and salt. Bring to a slow boil on medium heat stirring frequently. When its just calmly bubbling (not a rolling boil) remove from the heat.
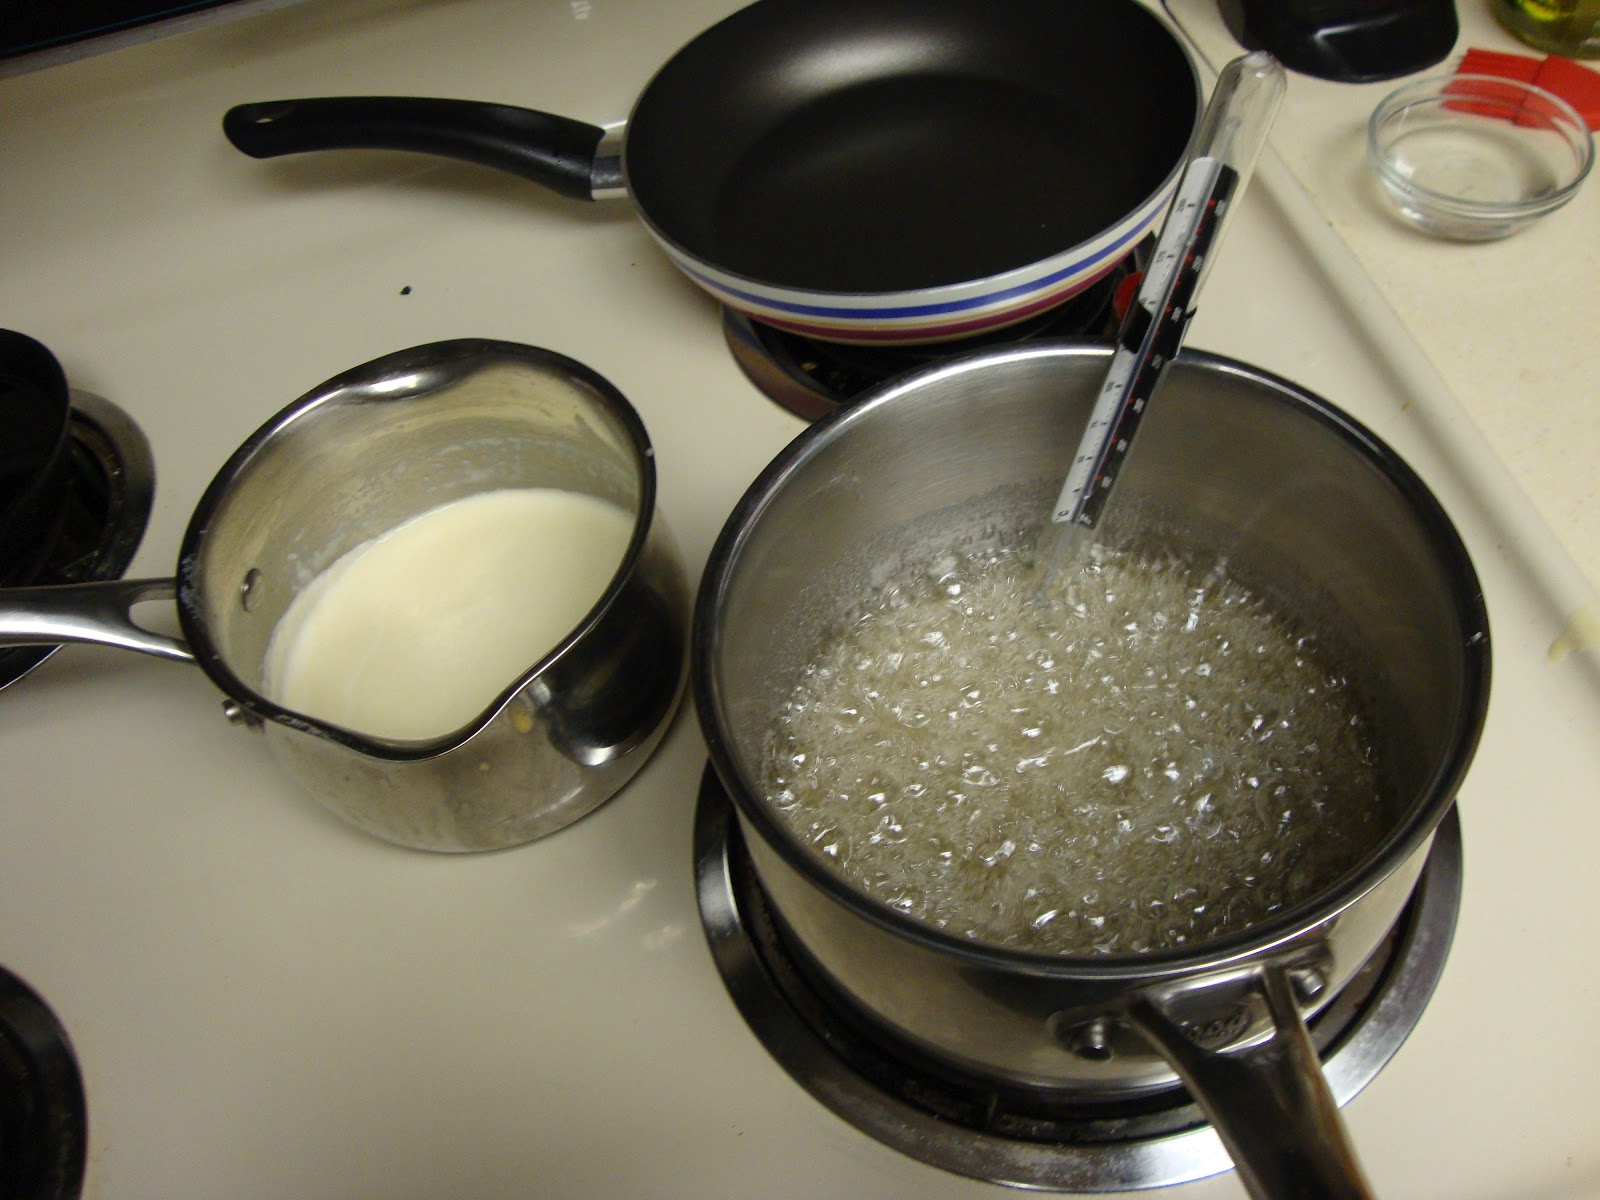
 In a 4 quart sauce pan with high sides mix together sugar, corn syrup and water (stir together only while the heat is not on yet!). Boil on med-high without stirring (a gentle swirl of the pan occasionally is helpful to avoid hot spots) until a light golden color, approximately 310 degrees. Not stirring is important! If you stir you will get a rogue sugar crystal in there and it will turn your beautiful melted sugar into a mass of crystals in seconds. The corn syrup is added to help prevent this but it can still happen. ( You can substitute tapioca syrup to make it a little healthier but it might be hard to find.)
 The sugar, syrup and water mixed off heat.
 Keep the cream mixture close by for quick adding when the sugar gets the right color and temp.

My pan got a hotspot and so one side of the sugar was a darker brown than the rest and this is how I messed up the first batch so watch out for this! When I saw the dark spot I swirled the pot and the temp shot up to 350 in less than a second ruining my first batch. In the future I'm not even going to use the thermometer because I found I was watching it way more than my sugar and that is why I didn't notice the dark spot in time. 
 Getting very close to the right color.

310!

  When the sugar is the right color take off the heat and add in the heavy cream mixture. BE CAREFUL! It will boil up like crazy!!! Glad you used that large sauce pan now huh? Return to heat and stir until mixture reaches 248 degrees. 
 Bubbly goodness!
Pour into the lined baking pan and let cool for 10 minutes. After the 10 minutes has passed you maybe sprinkle sea salt on the top if you like.
My boyfriend Sean hates the salt but I love it. Hes a picky eater that doesn't like anything "weird", his loss!

 Now this batch is the one where I was very carefully watching the color so it came out very soft and chewy. Next time I'm going to let it go a bit darker though since the flavor, while very good, is not as rich as I would like. It is very sweet, buttery and somewhat milky.

This is the batch I  let get too dark. Its temp was about 350. It came out with a very good strong caramel flavor and a very hard texture. Basically I made toffee instead of caramels. I prefer the flavor of this batch much better than the softer version. I hope that my next batch will be somewhere in the middle.
If you make the toffee I just broke it into  pieces by putting them in a bag and hitting them on the counter. These caramels are very rich so you want small pieces, especially with the soft ones. 
I found the salt especially good with the richer flavor of the toffee.


(the glass of wine is optional but recommended)

With the soft ones you'll want to put them in the freezer for about 15-20 mins. before cutting them with a sharp knife. You really want to go small here I can't stress it enough. I know you think you wanna eat a huge piece but you don't. You should get close to 100 pieces out of one batch.

Soft caramels wrapped in wax paper

Wrap each piece of soft caramel in its own little wax paper or parchment paper wrapper. Don't try to skip this and just put them in a tin unwrapped or you'll end up with a sticky mess. They may stay at room temp for about 3 weeks just fine. I keep mine in the refrigerator though to keep the toffee crunchy and the soft caramels from melting in the heat here in Southern California. I would recommend this as I think the soft ones are just a bit too soft at room temp. It will take the toffee about 24 hours to be really crunchy. The first day it is completely edible but will be a bit sticky when you eat it and not crunch well. 

Well those were my attempts to make chewy caramels. I haven't gotten it quite perfect yet but I have made 2 very good candies. Try this recipe at home! Even when I got it wrong I made better candy than I've ever bought at a store and the ingredients only cost around $10. So what do you have to lose?